Skip to product information
1 of 3

Antastic Tom

Starter Outworld

Starter Outworld

Regular price £14.99 GBP
Regular price Sale price £14.99 GBP
Sale Sold out
Taxes included. Shipping calculated at checkout.
Colour
Quantity

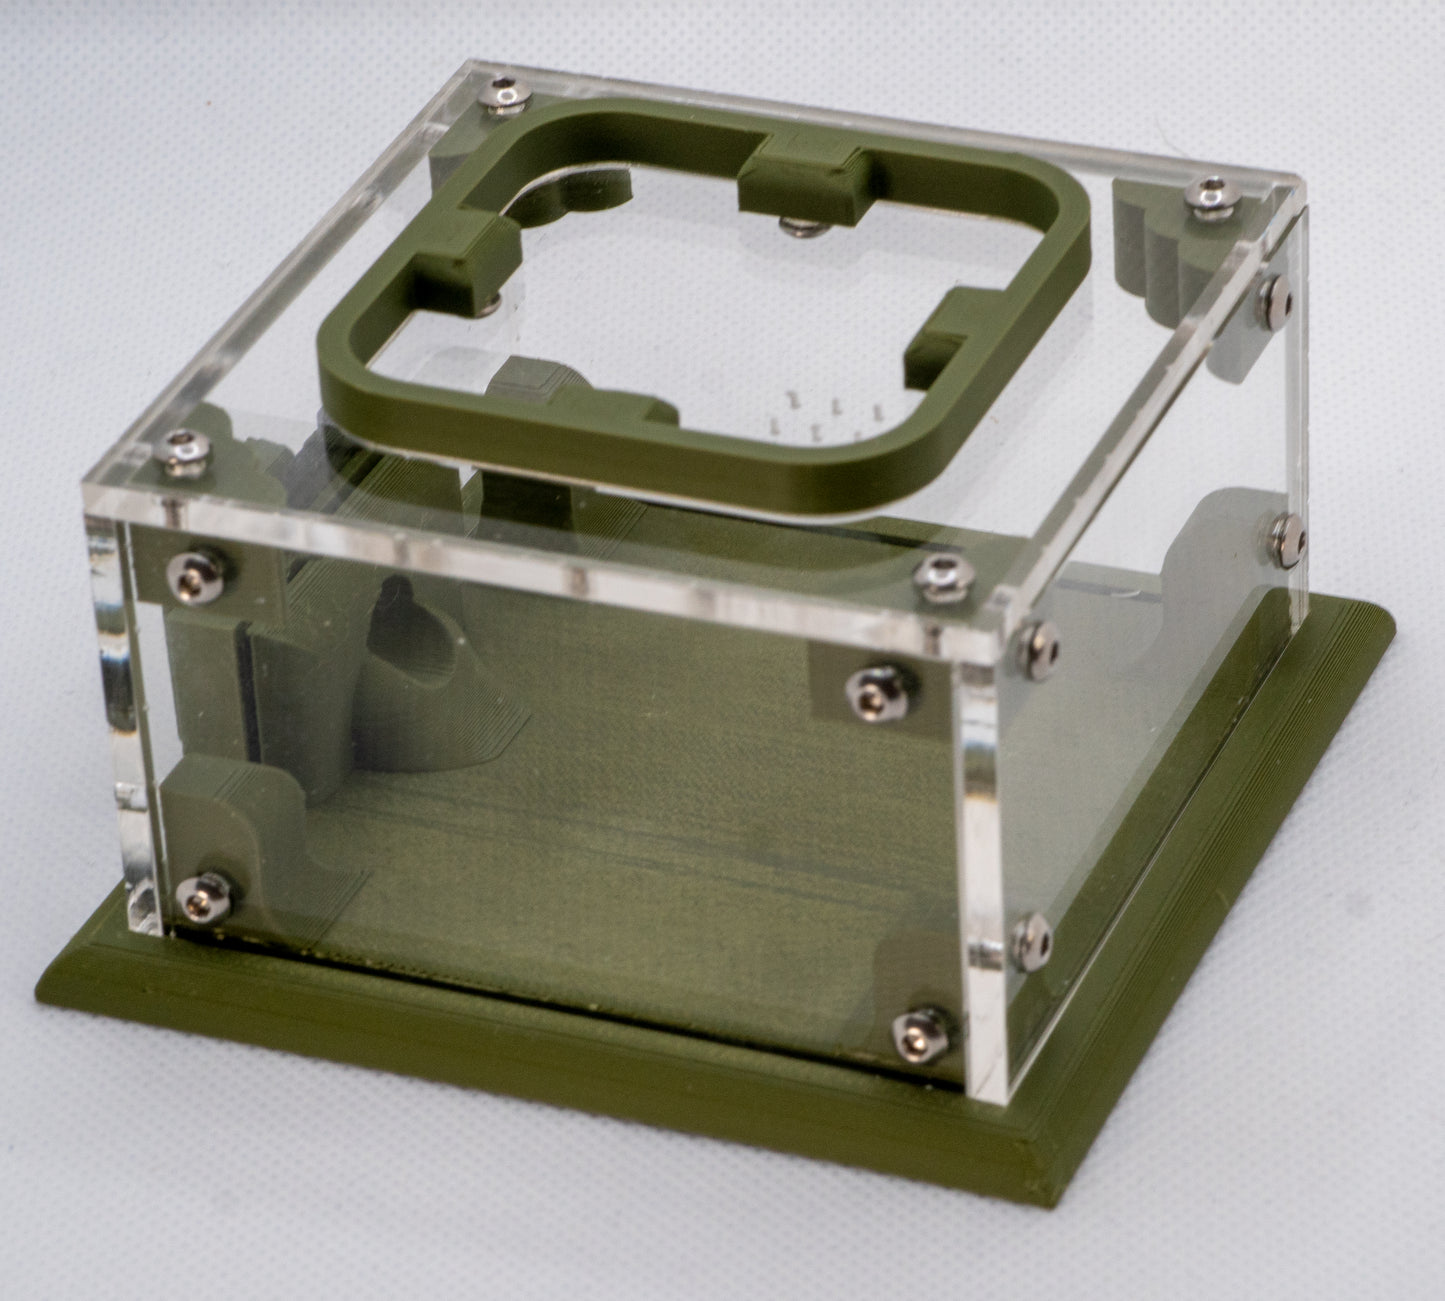
A compact feeding and foraging area designed for first workers and small developing colonies.

The Starter Outworld provides controlled access to food, water and a small external space while allowing the colony to remain securely housed inside its existing test tube, Founding Pod or nest.

Designed specifically for early-stage colony management, it offers enough room for feeding and waste removal without introducing an unnecessarily large environment too soon.

Best suited for:

  • Nanitic-stage colonies
  • Colonies with their first workers
  • Controlled feeding and waste removal
  • Gentle early foraging
  • Low-stress modular expansion

Compatible with:

  • Founding Pods
  • Small Nests
  • Test-tube setups using compatible connectors
  • Other current Antastic Tom modular products

What’s included

  • 1 × PLA Starter Outworld base
  • 4 × clear acrylic wall panels
  • 1 × clear acrylic top panel
  • 1 × removable clear acrylic access lid
  • 1 × PLA lid surround
  • 4 × PLA triangular corner anchors
  • 1 × PLA nest-to-module connector
  • 1 × TPU retention clip
  • 1 × complete screw set for assembling the walls, top and removable lid

The screw set includes the smaller screws required to attach the PLA surround to the removable acrylic lid.

Dimensions and compatibility

External dimensions: To be confirmed

Internal floor space: To be confirmed

Internal height: To be confirmed

Acrylic thickness: 3 mm

Materials: PLA, TPU and clear acrylic

The Starter Outworld uses the current Antastic Tom modular connector system and is compatible with all current Antastic Tom modular products.

Who it’s for

The Starter Outworld is designed for colonies that need external feeding access but do not yet require a large foraging area.

It is best suited to:

  • Queens with their first workers
  • Small nanitic-stage colonies
  • Colonies housed in a Founding Pod or Small Nest
  • Semi-claustral queens requiring controlled feeding access
  • Keepers introducing an outworld for the first time
  • Smaller species that may remain comfortable in a compact space for longer

The Starter Outworld is intentionally small. This makes food easier for young colonies to locate and gives the keeper better control over cleaning, waste removal and escape prevention.

Larger or rapidly growing colonies should be moved to a larger outworld once the available floor space becomes restrictive or difficult to maintain.

Setup and use

The Starter Outworld is supplied as a self-assembly product.

1. Fit the acrylic walls

Place each acrylic wall into the corresponding groove in the PLA base.

Make sure every panel is:

  • Fully seated in the groove
  • Positioned vertically
  • Aligned with the adjoining wall
  • Facing the correct direction before screws are fitted

Secure each wall to the lower PLA uprights using the supplied main body screws. Use two screws for each wall section where indicated.

Do not fully tighten the screws until all four walls are correctly positioned.

2. Install the corner anchors

Place one triangular anchor into each upper corner.

Each anchor joins two acrylic walls at a 90-degree angle. Fit one screw through each adjoining wall and into the anchor.

There should be one anchor at each corner:

  • Front-left
  • Front-right
  • Rear-left
  • Rear-right

Tighten the screws gradually, alternating between corners so the panels remain square.

3. Attach the acrylic top panel

Position the acrylic top panel over the four walls,

Secure the top panel into the triangular corner anchors using the supplied screws.

Check that:

  • The top sits flat
  • No acrylic wall has lifted from the base groove
  • The corners remain square
  • There are no visible gaps between panels

4. Assemble the removable lid

Position the PLA surround over the removable acrylic lid.

Attach the surround using the four smaller screws supplied for this part of the assembly. Tighten them only until the acrylic is held securely.

Do not overtighten these screws, as excessive pressure may crack the acrylic or distort the PLA surround.

Once assembled, place the lid into the cut-out in the acrylic top panel. Check that it sits flat and cannot be pushed aside easily.

5. Fit the modular connector

Insert the PLA nest-to-module connector into the chosen connection port.

Fit the TPU retention clip into the upper retaining slot to help prevent the connector from being pulled out accidentally.

Connect the Starter Outworld to the colony’s existing test tube, Founding Pod or nest and check the entire route for gaps before allowing ants access.

6. Prepare the feeding area

Place food on a removable feeding tray or feeding dish where possible.

Avoid overfilling the outworld with substrate or decoration. Keeping the floor relatively open makes it easier to:

  • Spot escaping ants
  • Find waste
  • Remove leftover food
  • Observe colony behaviour
  • Clean the outworld

Allow the ants to explore in their own time. Do not shake or force them into the outworld.

Care and maintenance

The Starter Outworld is supplied as a self-assembly product.

1. Fit the acrylic walls

Place each acrylic wall into the corresponding groove in the PLA base.

Make sure every panel is:

  • Fully seated in the groove
  • Positioned vertically
  • Aligned with the adjoining wall
  • Facing the correct direction before screws are fitted

Secure each wall to the lower PLA uprights using the supplied main body screws. Use two screws for each wall section where indicated.

Do not fully tighten the screws until all four walls are correctly positioned.

2. Install the corner anchors

Place one triangular anchor into each upper corner.

Each anchor joins two acrylic walls at a 90-degree angle. Fit one screw through each adjoining wall and into the anchor.

There should be one anchor at each corner:

  • Front-left
  • Front-right
  • Rear-left
  • Rear-right

Tighten the screws gradually, alternating between corners so the panels remain square.

3. Attach the acrylic top panel

Position the acrylic top panel over the four walls,

Secure the top panel into the triangular corner anchors using the supplied screws.

Check that:

  • The top sits flat
  • No acrylic wall has lifted from the base groove
  • The corners remain square
  • There are no visible gaps between panels

4. Assemble the removable lid

Position the PLA surround over the removable acrylic lid.

Attach the surround using the four smaller screws supplied for this part of the assembly. Tighten them only until the acrylic is held securely.

Do not overtighten these screws, as excessive pressure may crack the acrylic or distort the PLA surround.

Once assembled, place the lid into the cut-out in the acrylic top panel. Check that it sits flat and cannot be pushed aside easily.

5. Fit the modular connector

Insert the PLA nest-to-module connector into the chosen connection port.

Fit the TPU retention clip into the upper retaining slot to help prevent the connector from being pulled out accidentally.

Connect the Starter Outworld to the colony’s existing test tube, Founding Pod or nest and check the entire route for gaps before allowing ants access.

6. Prepare the feeding area

Place food on a removable feeding tray or feeding dish where possible.

Avoid overfilling the outworld with substrate or decoration. Keeping the floor relatively open makes it easier to:

  • Spot escaping ants
  • Find waste
  • Remove leftover food
  • Observe colony behaviour
  • Clean the outworld

Allow the ants to explore in their own time. Do not shake or force them into the outworld.

Frequently asked questions

When should I add an outworld?

For fully claustral species, an outworld is normally introduced once the first workers have arrived and the colony requires regular feeding.

Semi-claustral queens may need feeding access earlier because they naturally forage during founding.

Is the Starter Outworld suitable for a queen without workers?

It can be used for a semi-claustral queen that needs controlled feeding access.

Most fully claustral queens are better left undisturbed in a secure test-tube setup until their first workers arrive.

How large a colony can it hold?

There is no exact worker limit because species differ in size and activity.

It is primarily intended for first workers and small colonies. Upgrade when the available floor space becomes crowded, feeding becomes difficult or the colony consistently occupies most of the outworld.

Does it arrive assembled?

No. The Starter Outworld is supplied as a self-assembly product.

The acrylic walls fit into grooves in the PLA base and are secured using the supplied screws and triangular corner anchors.

Why is it supplied as a kit?

The self-assembly design protects the acrylic components during production and packaging while allowing individual panels to be replaced if necessary.

It also keeps the modular construction visible and accessible for maintenance.

Do I need glue?

No glue should be required when the components are correctly aligned and secured using the supplied screws.

Do not glue the removable lid or modular connector.

Should I use substrate?

Substrate is optional.

A bare or lightly covered floor is usually easier to clean and makes waste easier to identify. A thin substrate layer may be used for appearance or to improve grip, provided it does not obstruct the wall grooves, connector or lid.

Do I need an escape barrier?

An escape barrier is recommended for many species, especially small or fast-moving ants.

Apply the barrier around the upper internal walls according to the manufacturer’s instructions. Keep it away from food and the colony’s main travel routes.

Can ants escape around the removable lid?

The lid is designed to sit securely within the acrylic top opening when assembled correctly. However, its fit should be checked regularly, particularly with very small species.

Ensure the lid surround is correctly attached and that no substrate or debris prevents the lid from sitting flat.

What is the TPU retention clip for?

The retention clip fits above the modular connector and helps prevent it from being pulled or knocked out of the outworld.

The clip should be installed before allowing ants access to the connected system.

Can I connect it directly to a test tube?

Yes, provided the correct compatible Antastic Tom test-tube connector is used. The supplied nest-to-module connector is intended to join the outworld to another modular product.

Should food and water be placed inside the outworld?

Yes. The outworld is the preferred location for feeders, sugar sources and protein.

Using removable feeding dishes makes cleaning easier and reduces residue on the PLA base.

Is it completely escape-proof?

No ant setup should be advertised as completely escape-proof. Correct assembly, suitable connectors, a secure lid and regular inspections are all required.

An escape barrier may still be necessary depending on the species being kept.

When should I upgrade to a larger outworld?

Upgrade when:

  • The colony frequently crowds the available floor space
  • Feeding without disturbing the ants becomes difficult
  • Waste accumulates rapidly
  • Multiple feeders no longer fit comfortably
  • The colony’s activity level exceeds the available area

The aim is gradual expansion rather than moving a very small colony into a large environment unnecessarily.

View full details